
The “best” beam angle is a myth; the optimal solution is an engineered system of multiple, specific beam angles chosen based on function.
- Wide angles (60°+) are for ambient, general illumination, while narrow angles (15-40°) are for task and accent lighting.
- Fixture placement, IC-ratings, and dimmer compatibility are as critical as the beam angle itself for performance and safety.
Recommendation: Instead of seeking one perfect angle, design a layered lighting plan with distinct zones for ambient, task, and accent lighting, each with a mathematically appropriate beam angle and layout.
The selection of recessed lighting often culminates in a single, frustrating question about beam angles, as if a magic number exists that will solve all illumination problems for a standard 8-foot ceiling. Homeowners are frequently paralyzed by technical specifications, leading to common outcomes: a ceiling that resembles Swiss cheese, harsh glare that causes headaches, or dim, uninviting spaces. The conventional wisdom to simply “use a 60-degree beam angle” is a gross oversimplification that ignores the fundamental physics of light and the specific purpose of each room.
This approach treats lighting as mere decoration rather than a critical architectural component. The true cause of poor lighting is not the choice of a “wrong” beam angle, but the failure to design a cohesive lighting system. Issues like flickering LEDs, exorbitant energy bills from inefficient fixtures, and the inability to properly highlight features like artwork or a stone fireplace all stem from a lack of systematic planning. These are not isolated problems but symptoms of a flawed design philosophy.
But what if the key wasn’t finding a single perfect angle, but rather understanding how to engineer a layered system of light? The architect’s approach is not to guess, but to calculate. It involves treating light as a tool and deploying specific beam angles with geometric precision to perform distinct functions—ambient, task, and accent. This methodology transforms light from a simple utility into an integral part of your home’s architecture, enhancing both its functionality and its beauty.
This guide deconstructs the architectural process for designing a recessed lighting plan. We will move beyond simplistic rules of thumb to explore the critical, interconnected decisions that produce a professional, comfortable, and efficient lighting environment. From fire safety and dimmer science to layout geometry and smart home integration, you will learn to think about light not as a product, but as a system to be engineered.
Summary: A Systematic Approach to Recessed Lighting Design
- Why Are Your “Eco-Friendly” Halogens Costing You $50 More Per Year?
- IC-Rated vs. Non-IC: The Fire Safety Check You Must Do Before Drilling
- Dimmer Compatibility: Why Do Your New LED Spots Flicker?
- Wall-Washing vs. Grazing: How to Highlight Stone Fireplaces?
- How to Layout Spotlights to Avoid “Swiss Cheese” Ceiling Syndrome?
- The Lighting Mistake That Causes Headaches for 70% of Remote Workers
- Phantom Load: How Much Is Your Gaming Console Costing You in Standby Mode?
- Matter Protocol: Will It Finally Make Your Alexa Talk to Your HomeKit?
Why Are Your “Eco-Friendly” Halogens Costing You $50 More Per Year?
The term “eco-friendly” can be misleading when it comes to lighting technology. While modern halogens are an improvement over their incandescent predecessors, their efficiency pales in comparison to a properly specified LED system. The critical factor is not just the wattage of the bulb, but the luminous efficacy—how much of the light produced actually performs useful work. A wide, uncontrolled beam angle is a primary source of wasted energy, as it spills light into areas where it isn’t needed.
Consider the mathematics of coverage. A wider beam angle allows for fewer fixtures to illuminate a given space, which directly translates to lower initial and operational costs. For general ambient lighting in a room with 8-foot ceilings, a lighting efficiency study shows that using 60-degree beam angle LEDs can require 44% fewer fixtures than using narrower 40-degree alternatives to achieve the same level of uniform illumination. This reduction in fixture count directly reduces total wattage, labor costs, and long-term energy consumption.
The difference is not trivial. Using ten 10W narrow-beam fixtures when six 10W wide-beam fixtures would suffice results in an excess of 40W of constant power draw. Over the course of a year, this inefficiency can easily add $50 or more to your electricity bill for a single room. The true cost of a lighting system is a function of its total wattage, which is dictated by the layout, and the layout is a direct function of the chosen beam angle. Therefore, selecting the correct beam angle for the task is the foundational step in engineering a genuinely cost-effective and efficient lighting plan.
IC-Rated vs. Non-IC: The Fire Safety Check You Must Do Before Drilling
Before any discussion of beam angles or aesthetics, the non-negotiable first principle of recessed lighting is safety. The most critical specification in this regard is the fixture’s IC-rating. “IC” stands for Insulation Contact. An IC-rated fixture is engineered and tested to be safely installed in direct contact with ceiling insulation. A non-IC-rated fixture is not and represents a significant fire hazard if installed improperly.
Non-IC fixtures require a mandatory safety clearance, typically a minimum of three inches away from any insulation material and half an inch from combustible ceiling joists. This is because the heat generated by the bulb and housing can, over time, pose a risk of igniting the surrounding materials. In a standard 8-foot ceiling, which is almost always insulated, this clearance requirement severely restricts placement options and can make achieving an optimal lighting layout impossible without compromising safety.
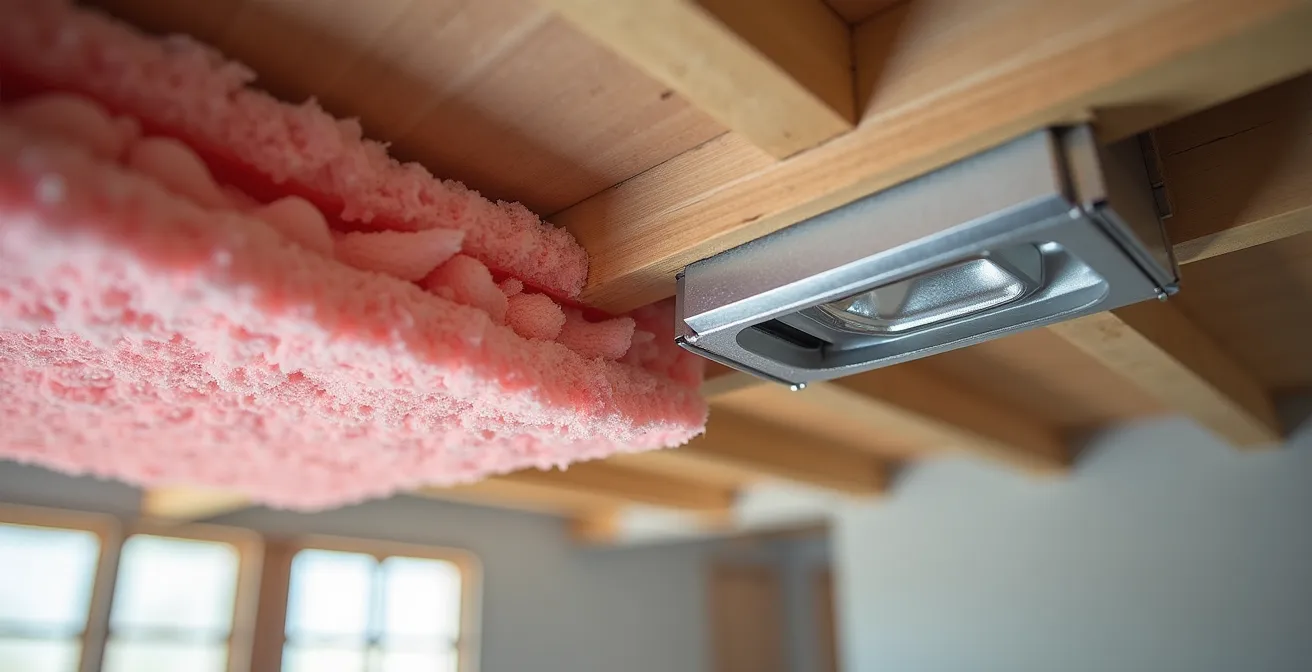
As the diagram above illustrates, an IC-rated housing allows the fixture to be placed exactly where the lighting plan dictates, without concern for proximity to insulation. This freedom is crucial for executing precise layouts for wall-washing, task lighting, and avoiding the “Swiss Cheese” effect. Forcing a layout to accommodate the clearance needs of non-IC fixtures often leads to poor lighting performance and visual discomfort.
Case Study: The Home Depot Installation Mandate
To underscore the importance of this specification, major retailers provide strict guidelines. For instance, Home Depot’s official installation guide emphasizes that a non-IC rated fixture requires a minimum 3-inch clearance from all insulation. Their guidance explicitly directs installers towards IC-rated remodel housings for existing ceilings, as this is the only way to guarantee both safety and the flexibility needed for optimal fixture placement. Choosing an IC-rated fixture is not a premium feature; it is the baseline requirement for safe and effective recessed lighting in an insulated ceiling.
Dimmer Compatibility: Why Do Your New LED Spots Flicker?
The annoying flicker from a newly installed set of dimmable LEDs is a common complaint, and it’s rarely the fault of the fixture itself. This phenomenon is almost always a symptom of a systemic failure: an incompatibility between the LED driver, the dimmer switch, and sometimes even the beam angle of the light. Unlike simple incandescent bulbs, LEDs are complex electronic devices that require specific types of dimmers to function correctly.
There are two primary types of dimmers: leading-edge and trailing-edge. Older, cheaper leading-edge dimmers were designed for the high power draw of incandescent bulbs and can cause flickering, buzzing, or a limited dimming range with low-wattage LEDs. Modern trailing-edge dimmers, including Electronic Low Voltage (ELV) models, are specifically designed to handle the sophisticated electronics of LED drivers, providing smooth, flicker-free dimming down to very low light levels.
Interestingly, the beam angle can influence the perception of flicker. A narrow, focused beam of light (15-25°) creates a high-contrast pool of light. Any instability in the power delivery from an incompatible dimmer will be highly visible as a distinct flicker within this concentrated area, leading to eye strain. A wider beam angle (60°+) creates a softer, more diffuse ambient light where the same level of instability is less perceptible to the human eye.
This table illustrates how beam angle choice intersects with dimmer technology. It is a clear demonstration that a lighting plan must account for the entire electrical system, not just the bulb.
| Beam Angle | Flicker Visibility | Eye Strain Risk | Recommended Dimmer Type |
|---|---|---|---|
| 15-25° (Narrow) | Highly noticeable | High | Electronic Low Voltage (ELV) |
| 40-45° (Medium) | Moderate | Medium | Trailing Edge |
| 60-90° (Wide) | Minimal | Low | Standard LED Compatible |
As confirmed by a comparative analysis of lighting components, ensuring your dimmer is explicitly listed as compatible with your chosen LED fixture is a non-negotiable step to prevent performance issues. For critical task areas using narrow beams, investing in a high-quality ELV dimmer is essential for visual comfort.
Wall-Washing vs. Grazing: How to Highlight Stone Fireplaces?
Using light to accentuate vertical surfaces is a hallmark of sophisticated lighting design. However, the techniques of “wall-washing” and “grazing” are often confused, leading to disappointing results. The choice between them depends entirely on the texture of the surface and the desired effect, and the execution is a precise calculation of beam angle and placement.
Wall-washing is used to create a smooth, even field of light on a flat, untextured surface like a painted wall. The goal is to make the wall itself appear to glow, which can make a space feel larger and brighter. This is achieved with wider beam angles (40-60°) placed a significant distance from the wall.
Grazing, conversely, is used to dramatically highlight texture. By placing a very narrow beam of light (15-25°) extremely close to a textured surface like a stone fireplace, brick wall, or drapery, you create sharp shadows that reveal and accentuate the material’s depth and character. Attempting to “graze” with a wide beam angle or from too far away will simply wash out the texture.
For an 8-foot ceiling, the placement is a matter of geometry, not guesswork. According to established design principles, professional lighting designers recommend placing grazing lights 8-12 inches from the wall, while wall-washing fixtures should be positioned 24-36 inches out. This precise placement ensures the light strikes the surface at the correct angle to achieve the intended effect.
Action Plan: The 8-Foot Ceiling Wall Lighting Formula
- Define Objective: For a smooth painted wall, choose wall-washing. For a stone fireplace or textured accent wall, choose grazing.
- Select Fixture and Placement: For a grazing effect, position fixtures with a 15°-25° beam angle 8-12 inches from the wall. For a wall-washing effect, place fixtures with a 40°-60° beam 24-36 inches from the wall.
- Calculate Overlap: Space the fixtures horizontally so that their light pools overlap by approximately 30%. This prevents dark spots between lights and ensures a continuous effect.
- Test with Adjustability: Use adjustable “gimbal” trims. Before final installation, power them on and aim them to fine-tune the effect and eliminate any unwanted scalloping or hot spots.
- Consider Asymmetric Beams: For professional-grade wall-washing, investigate specialized fixtures with asymmetric beam angles designed to throw light evenly down a vertical surface from a single side.
How to Layout Spotlights to Avoid “Swiss Cheese” Ceiling Syndrome?
One of the most common and visually jarring mistakes in residential lighting is the “Swiss Cheese” or “runway” ceiling: a grid-like, uniform pattern of recessed lights laid out without any regard for the room’s function or furniture placement. This approach treats the ceiling as a flat plane to be decorated with fixtures, rather than as a source of functional, comfortable light for the living space below.
A successful lighting layout is not uniform; it is zoned. The correct methodology involves identifying the different functional zones within a room—a seating area for conversation, a kitchen island for tasks, a wall for displaying art—and designing a specific lighting layer for each. A general rule for spacing ambient lights in a room with 8-foot ceilings is the “height divided by two” formula, which suggests a 4-foot spacing between fixtures. However, this is only a starting point for the ambient layer.

Task and accent zones require their own dedicated layouts, often with different beam angles and spacing, layered on top of the ambient light. This zoned approach, as shown in the layout above, concentrates light where it is needed and leaves other areas of the ceiling clean and uncluttered. This not only improves visual comfort by reducing glare but also creates a more sophisticated and architecturally integrated aesthetic.
Case Study: Rowabi’s Zone-Based Strategy
Lighting specialists at Rowabi demonstrate this principle effectively. For an open-concept space with an 8-foot ceiling, they reject a single grid. Instead, they create separate zones. The general living area uses four fixtures with very wide 90° beams for soft, ambient light, spaced according to the “height/2” rule. Over the kitchen island, a separate group of three fixtures with more focused 40° beams provides a higher level of illumination for tasks. This zone-based approach achieves 90% lighting uniformity where needed while completely eliminating the cluttered “Swiss Cheese” effect and providing superior functionality.
The Lighting Mistake That Causes Headaches for 70% of Remote Workers
The shift to remote work has placed a new emphasis on home office ergonomics, yet lighting is often the most poorly addressed factor. The primary culprit for headaches, eye strain, and fatigue in a home office is not insufficient light, but misapplied light that creates glare. The most common form of this is veiling glare, a washout reflection on a computer screen caused by a poorly positioned overhead light source.
This glare is typically caused by a single, wide-angle recessed light placed directly above the desk. The light travels down, hits the screen, and reflects directly into the user’s eyes, forcing them to squint and strain to see the content. The intuitive “solution” of adding more light only exacerbates the problem. The architectural solution is not about brightness (lumens), but about controlling the geometry of light.
The correct strategy for an 8-foot ceiling is to use two adjustable (gimbal) recessed lights with a narrower beam angle, typically 30-40°. Instead of being placed directly overhead, they should be positioned to the sides of the desk, slightly in front of the user. They are then aimed to cross their beams on the work surface *in front* of the screen, illuminating the keyboard and documents without creating a direct reflection on the monitor. This cross-illumination technique provides ample task lighting while keeping the screen in a “quiet” zone free from direct light sources. Research into effective office illumination shows that this targeted approach can succeed in eliminating screen glare for 70% of workers who were previously experiencing it.
Key Takeaways
- Light Is an Engineered Tool: The optimal beam angle is determined by a specific function (ambient, task, or accent), not a universal rule.
- Layout Overrides Fixture: A strategic, zoned layout using the “ceiling height divided by two” rule as a starting point is more critical than the specific fixture model.
- The System Is Everything: Performance depends on the entire system working in harmony—the IC-rated fixture, the compatible dimmer, and the correct beam angle for the task.
Phantom Load: How Much Is Your Gaming Console Costing You in Standby Mode?
The concept of “phantom load” or “vampire power” is well-understood in electronics: devices that continue to draw power even when in standby mode. While a lighting fixture is either on or off, a poorly designed lighting system creates an optical equivalent of phantom load: wasted light. This occurs when the beam angle is too wide for the intended task, spilling a significant percentage of its lumens into unproductive areas.
This light spill is not just an aesthetic issue; it is a direct and quantifiable waste of energy and money. When a 90° wide-angle fixture is used to light a 3-foot-wide kitchen island from an 8-foot ceiling, a massive portion of the light misses the target, spilling onto the floor and surrounding areas. That “spilled” light is paid for but performs no useful work, exactly like the phantom load of a console in standby. Choosing a more focused 40° beam angle would contain a much higher percentage of the light on the target surface, achieving the desired illumination level with less total energy.
Light spill from poorly chosen wide beam angles is the optical equivalent of phantom power load – you’re paying for lumens that do no useful work.
– Energy Efficiency Consultant, LED Lighting Efficiency Report
This table provides a stark, mathematical comparison of the costs associated with poor optical control. The annual cost difference demonstrates that selecting a beam angle is an economic decision as much as it is a design choice.
| Setup | Beam Angle | Light on Target | Wasted Light | Annual Cost |
|---|---|---|---|---|
| 3ft Kitchen Island | 90° wide | 40% | 60% spill | $75 |
| 3ft Kitchen Island | 40° focused | 85% | 15% spill | $45 |
| Hallway | 60° medium | 70% | 30% trespass | $55 |
This principle of containing light is fundamental to efficient design. An analysis of downlight efficiency shows that matching the beam angle to the task can reduce wasted light by over 75%, with corresponding savings on energy costs.
Matter Protocol: Will It Finally Make Your Alexa Talk to Your HomeKit?
The promise of the Matter protocol is a unified smart home, where devices from different manufacturers communicate seamlessly. For lighting, this means creating complex scenes—”Movie Night,” “Cooking,” “Reading”—with a single command. However, the success of these smart scenes is not determined by the software protocol alone. It is fundamentally dependent on the underlying physical lighting infrastructure.
A smart system can only control the lights that are installed. If a room has only one type of fixture with a single wide beam angle, the only “smart” control possible is simple dimming. The true power of a Matter-enabled system is unlocked when it can control a layered lighting plan. This requires having a physical foundation of different fixture types with varied beam angles already installed in distinct zones.
For example, a “Movie Night” scene can be programmed to execute a series of commands simultaneously: dim the wide-angle 60° ambient fixtures to a soft 10% glow, turn off the 40° task lights over the kitchen island, and activate the narrow 25° accent lights focused on the fireplace at 50% brightness. This dynamic, multi-layered effect is only possible because the physical hardware—the distinct ambient, task, and accent lighting zones—was designed and installed from the beginning.
As smart home integration specialists point out, a well-designed layered lighting plan with distinct beam angles for different zones is what gives Matter its power. Without this physical foundation, smart controls are severely limited. Therefore, planning your beam angles and zones today is a crucial step in future-proofing your home for the advanced capabilities of tomorrow’s smart technology. The intelligence of your home is directly proportional to the quality of its physical design.
Ultimately, a successful lighting plan is an exercise in applied physics and intentional design. By moving beyond the search for a single “best” beam angle and adopting a systematic, zoned approach, you can engineer a lighting environment that is comfortable, efficient, and perfectly tailored to your lifestyle. Begin by auditing your spaces, defining their functions, and applying these architectural principles to build your plan layer by layer.
Frequently Asked Questions About Home Office Lighting
What causes veiling glare on computer screens?
Veiling glare is caused by reflections from light sources positioned directly overhead. For an 8-foot ceiling, a wide-angle recessed light placed above the desk will reflect off the screen into your eyes. The solution is to use narrower 30-40° beams positioned to the sides of the desk, not directly above it.
How should I position lights for a home office with 8-foot ceilings?
The optimal setup involves placing two adjustable gimbal lights, one on either side of your desk. They should have a 30-40° beam angle and be aimed to cross their light streams on the work surface in front of you, illuminating your keyboard and papers while leaving the screen in shadow.
Why are gimbal trims essential for desk lighting?
Gimbal (adjustable) trims are non-negotiable for task lighting. They give you the precise angular control needed to direct the light cone away from your eyes and off the computer screen. This ability to fine-tune the light’s direction is what eliminates glare and ensures visual comfort in a workspace with 8-foot ceilings.