
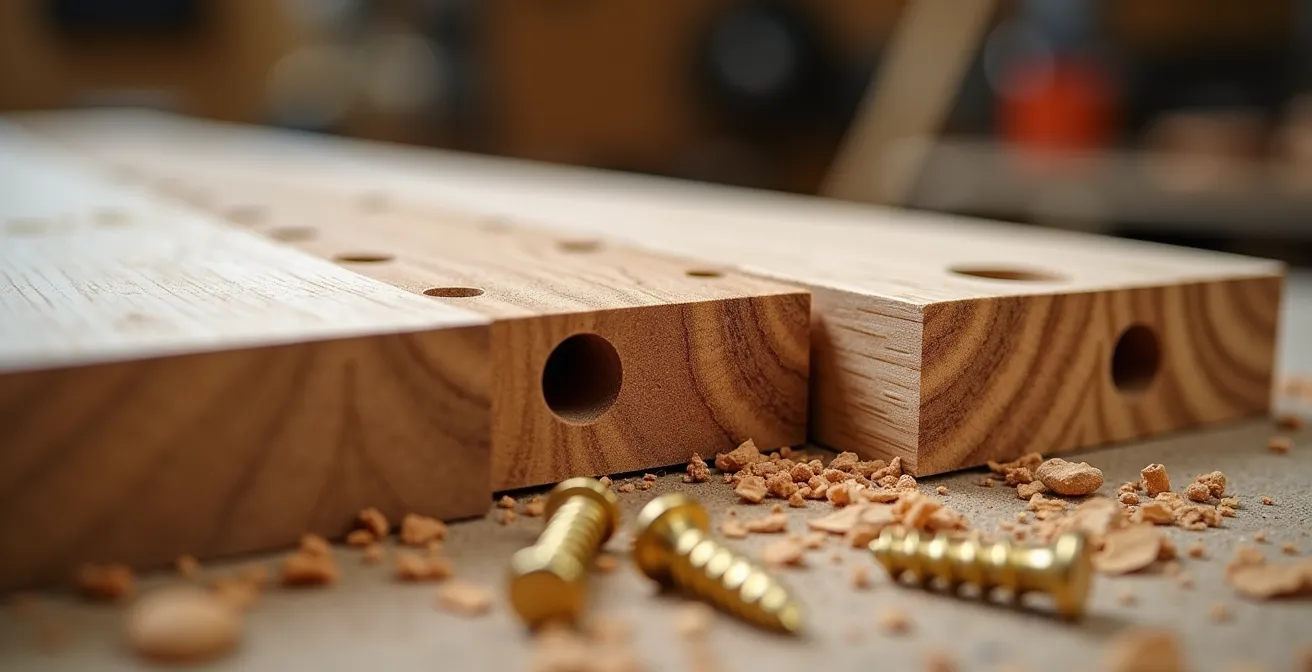
The true strength of a beginner’s table joint is not its breaking point in a lab, but its ability to resist the side-to-side racking forces of daily use that cause wobbling.
- Pocket holes provide excellent clamping pressure, pulling pieces together tightly, but offer minimal mechanical resistance to shear or racking stress.
- Dowels create a physical, mechanical lock within the joint, providing far superior stability against the specific forces that make a table feel unstable.
Recommendation: For critical structural joints like table aprons and legs, a beginner should prioritize dowels or other simple mortise-and-tenon style joinery for a piece that will remain stable and wobble-free for years.
As a novice woodworker, you’ve likely asked the quintessential question: pocket holes or dowels? The internet is filled with debates praising the speed of pocket holes or the tradition of dowels. But this question, while important, is just the entry point into the world of true craftsmanship. The real challenge isn’t just joining two pieces of wood; it’s building a dining table that doesn’t wobble when someone leans on it, a piece of furniture that feels solid, intentional, and built to last. The answer lies not in a simple “this is stronger” declaration, but in understanding the forces at play.
A pocket hole screw is brilliant at one thing: clamping. It pulls two pieces of wood together with immense force. However, it offers very little resistance to racking forces—the side-to-side stress that plagues table legs. Dowels, on the other hand, create a mechanical lock. They physically prevent the wood from shifting, providing the shear resistance needed for a stable, long-lasting structure. For a beginner’s table, where stability is paramount, dowels are the mechanically superior choice for leg-to-apron joints.
This focus on the “why” behind the “how” is the secret that separates amateur work from enduring furniture. It’s a principle that extends far beyond joinery. Understanding the hidden mechanics of wood movement, the chemistry of finishes, and the logic of material selection is what empowers you to build with confidence. It’s about anticipating problems before they happen, whether it’s a tabletop cracking in winter or a coffee ring permanently staining your work.
This guide moves beyond the surface-level debates to answer eight critical questions every beginner faces. We will explore the science and techniques used by master carpenters to ensure every project is not just built, but crafted. From preventing wood from self-destructing to choosing the right finish and even building for comfort, these lessons form the foundation of quality woodworking.
Table of Contents: 8 Critical Questions for Novice Woodworkers
- Breadboard Ends: Why Your Table Top Cracked in Winter (And How to Prevent It)
- Polyurethane vs. Danish Oil: Which Finish Protects Against Coffee Rings?
- Pine vs. Oak: Is It Worth Spending 3x More on Hardwood for a First Project?
- Table Saw vs. Circular Saw: Which Should You Buy First for Furniture Making?
- The “Pencil Trick”: How to Know When You Are Done Sanding a Surface?
- Why Does Your Stylish Sofa Cause Lower Back Pain After 2 Hours?
- How to Build Custom Modular Storage Blocks for Under $150?
- Why Marble Etches: The Chemistry Lesson That Saves Your Countertops
Breadboard Ends: Why Your Table Top Cracked in Winter (And How to Prevent It)
One of the most heartbreaking moments for a new woodworker is discovering a crack running through their beautifully finished tabletop after the first change of seasons. The culprit isn’t a flaw in the wood, but a misunderstanding of its fundamental nature: wood movement. Wood is a hygroscopic material, meaning it absorbs and releases moisture from the air, causing it to expand and contract across its grain. For a wide panel like a dining table, this movement can be substantial, often accounting for as much as 1% of the total panel width over a year.
When you glue a solid piece of wood (a “breadboard end”) perpendicularly to the end grain of your tabletop panel, you create a battle of forces. The main panel wants to expand and contract, but the rigidly attached breadboard end prevents it. This builds immense internal stress until the wood fibers give way, resulting in a crack. As one case study shows, improperly glued breadboard ends where all tenons are fixed can lead to catastrophic failure within a single year.
The solution is not to avoid breadboard ends—they are excellent for keeping a panel flat. The solution is to build a joint that allows for this movement. The proper technique involves a strong center connection with flexibility at the outer edges. This allows the main panel to breathe without compromising the structure.
Polyurethane vs. Danish Oil: Which Finish Protects Against Coffee Rings?
After weeks of work, the last thing you want is for your project to be ruined by a single misplaced coffee mug. The choice of finish is not just about aesthetics; it’s your table’s first line of defense against daily life. The two most common choices for beginners, polyurethane and Danish oil, offer fundamentally different types of protection, which becomes obvious when you see how liquid behaves on their surfaces.

As the image demonstrates, some finishes create an impenetrable barrier while others allow liquids to seep in. This difference comes down to whether the finish is a film finish or a penetrating oil. Polyurethane is a film finish; it creates a plastic-like layer on top of the wood. Danish oil is a penetrating oil; it soaks into the wood fibers and hardens, protecting from within but leaving the surface more natural.
For ultimate protection against water rings, scratches, and spills, a film finish is superior. However, this durability comes at the cost of repairability—a deep scratch in polyurethane requires sanding down the entire surface. A penetrating oil is less durable initially but is incredibly easy to repair with a simple wipe-on touch-up. Your choice depends on the project’s intended use and your tolerance for maintenance.
| Feature | Polyurethane | Danish Oil |
|---|---|---|
| Water Ring Protection | Excellent with 3-4 coats | Moderate – requires reapplication |
| Repair Difficulty | Complex – requires sanding and recoating | Simple – wipe-on touch-ups |
| Durability | 10+ years | 2-4 years |
| Application Method | Brush/spray – skill required | Wipe-on with rag – foolproof |
| Cost per quart | $15-25 | $10-15 |
Pine vs. Oak: Is It Worth Spending 3x More on Hardwood for a First Project?
Walking into a lumberyard, the price difference between softwood like pine and hardwood like oak can be shocking. It’s tempting to save money by choosing pine for your first dining table, but will you regret it? The answer isn’t a simple yes or no. While oak is significantly harder, denser, and more resistant to dents and scratches, that doesn’t mean pine has no place in fine furniture.
The “softwood” label on pine refers to its botanical origin (a conifer), not necessarily its weakness. Certain species of pine are quite durable. However, common construction-grade pine is soft and prone to denting, which can be a major issue for a high-traffic surface like a tabletop. Oak, a hardwood, will withstand decades of use with minimal wear. The question for a beginner is not just about durability, but about budget and project goals. Spending a fortune on premium material for a first project, where mistakes are likely, can be disheartening.
A smarter, professional strategy is the hybrid approach. This involves using less expensive, but structurally sound, pine for the table’s base—the legs and aprons that are less likely to see direct impact. You then invest the savings into a high-quality hardwood like oak for the most visible and heavily used part: the tabletop. According to one analysis of professional practices, this hybrid strategy can reduce the overall material cost of a dining table by 40% while preserving the durability and premium feel where it matters most. This method delivers the best of both worlds: a budget-friendly project with a resilient, beautiful surface.
Table Saw vs. Circular Saw: Which Should You Buy First for Furniture Making?
The table saw is often called the heart of the workshop, and for good reason. Its ability to make precise, repeatable rip cuts and crosscuts is unmatched. However, for a beginner, its high cost and large footprint can be a significant barrier. This leads to a critical question: can you build high-quality furniture with just a handheld circular saw? The answer is an emphatic yes, provided you learn a key skill: how to use jigs.
A circular saw’s primary weakness is its reliance on the operator’s ability to follow a straight line. Jigs are shop-made accessories that transform your handheld saw into a precision cutting system, guiding it perfectly every time. A simple straight-edge guide, often made from a piece of plywood and an aluminum angle, allows you to make rip cuts as straight as any table saw. A crosscut sled provides the same level of accuracy for 90-degree cuts.
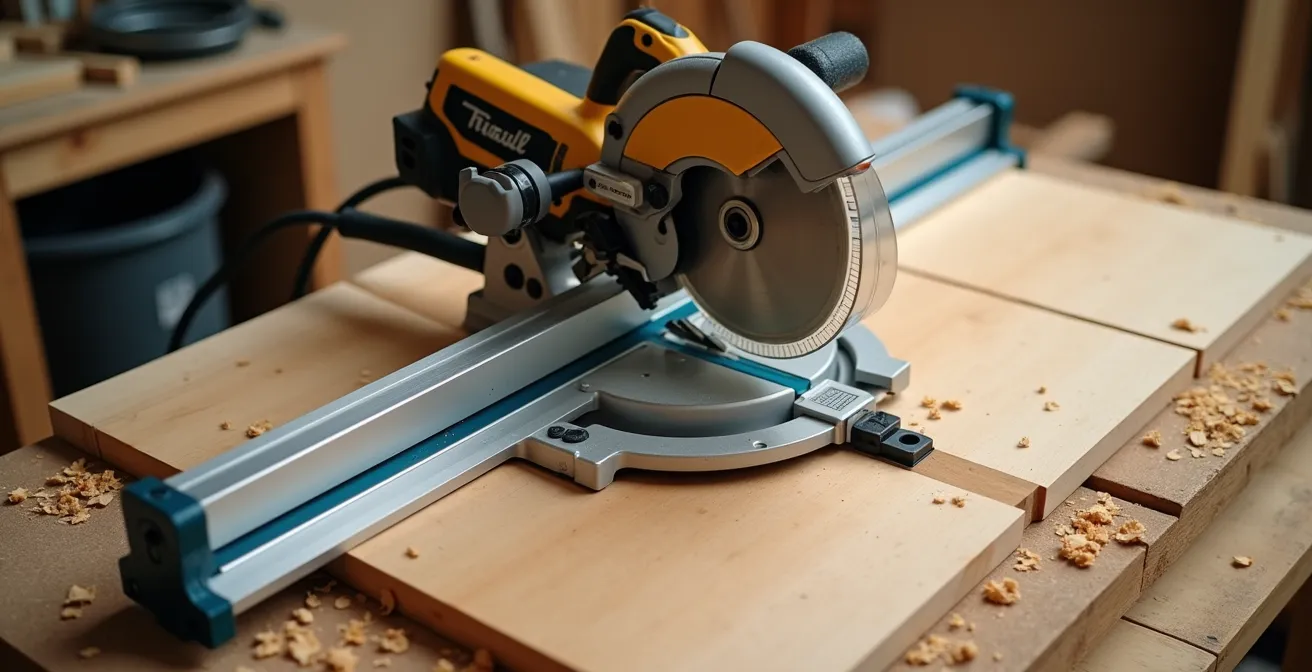
By investing a small amount of time and scrap material into building these jigs, you can achieve professional-quality results without the major investment in a table saw. This approach not only saves money but also teaches you invaluable lessons about precision and problem-solving. While you may eventually want a table saw for its efficiency, a circular saw paired with the right jigs is more than capable of building beautiful furniture.
Your Action Plan: Achieving Table Saw Quality with a Circular Saw
- Build a straight-edge guide: Use a factory-edge piece of 3/4″ plywood and attach a straight aluminum angle to create a reliable guide for long rip cuts.
- Create a crosscut sled: Build a simple sled that your saw can ride in to ensure perfectly square, repeatable 90-degree crosscuts on smaller boards.
- Use a sacrificial backing board: To prevent ugly tear-out on the bottom of your cut, always place a scrap piece of wood underneath your workpiece.
- Set up stop blocks: For cutting multiple pieces to the exact same length, clamp a block of wood to your sled or workbench to act as a physical stop.
- Clamp everything securely: Before every single cut, ensure both your workpiece and your guide are firmly clamped and cannot shift. This discipline is non-negotiable for accuracy.
The “Pencil Trick”: How to Know When You Are Done Sanding a Surface?
Sanding is the most tedious, yet most critical, step in achieving a flawless finish. Many beginners either sand too little, leaving visible scratches, or sand too much with a single grit, which only polishes those scratches. The biggest challenge is knowing when you’ve effectively removed the marks from the previous, coarser grit. The “pencil trick” is a simple, foolproof visual guide that solves this problem.
The process is straightforward. After sanding with your first grit (e.g., 80 or 100 grit), take a soft pencil and draw a light, wavy line across the entire surface of your board. Then, begin sanding with your next finer grit (e.g., 120 or 150). Your goal is to continue sanding with this new grit only until the pencil marks have completely disappeared. Once they are gone, you have a visual guarantee that you have uniformly sanded the entire surface and fully removed the deeper scratches from the previous grit.
You then repeat the process: draw new pencil lines and switch to the next finer grit (e.g., 220). This method removes the guesswork and ensures a methodical, even progression. For an even more advanced approach, you can correlate the hardness of your pencil to the grit you’re using. A harder pencil lead will only sit in the finer scratches, making them easier to spot as you progress.
| Sanding Grit | Pencil Hardness | What It Reveals |
|---|---|---|
| 80 grit | 2B (soft) | Deep scratches, mill marks |
| 120 grit | HB (medium) | Medium scratches, surface irregularities |
| 220 grit | 2H (hard) | Fine scratches, minor imperfections |
| 320+ grit | 4H (very hard) | Micro-scratches only |
Why Does Your Stylish Sofa Cause Lower Back Pain After 2 Hours?
You can build the most beautiful piece of furniture in the world, but if it’s uncomfortable, it has failed in its primary function. This is especially true for seating. That sleek, low-profile sofa might look perfect in a magazine, but if it causes back pain, its design is flawed. The cause is often a mismatch between the sofa’s dimensions and fundamental principles of human ergonomics.
Lower back pain from sitting is frequently caused by a lack of proper lumbar support, forcing your spine into a “C” shape and putting pressure on your spinal discs. Many stylish modern sofas have excessive seat depth and a backrest that is too upright or too reclined. Research on spinal biomechanics shows that the optimal angle for a seat back to minimize disc pressure is a gentle recline between 110 and 130 degrees. A 90-degree angle forces muscular strain, while too much recline offers no support.
Furthermore, if the seat is too deep, you’re forced to either slouch to reach the backrest or sit perched on the edge with no back support at all. If the foam is too soft, your hips sink below your knees, further straining your lower back. These are not subjective matters of taste; they are objective measurements that determine whether a piece of furniture works with the human body or against it.
Your 5-Point Ergonomic Audit Checklist: Sofa Comfort
- Measure seat depth: When sitting with your back against the cushions, you should have 2-3 inches of space between the front edge of the seat and the back of your knees.
- Test foam density: Press down with your fist. The foam should compress about 1-2 inches. If it sinks significantly more, it lacks proper support.
- Check the back angle: Use an angle finder app on your phone. The angle between the seat and the backrest should ideally fall within the 110-130 degree range.
- Assess seat height: Sit normally. Your feet should be flat on the floor with your knees at or slightly below a 90-degree angle. Your thighs should be parallel to the floor.
- Evaluate the lumbar gap: While seated, slide your hand into the space between your lower back and the sofa cushion. There should be no more than two fingers’ width of gap.
How to Build Custom Modular Storage Blocks for Under $150?
Custom storage can be transformative for a space, but it’s often prohibitively expensive. Building your own modular storage blocks is a perfect beginner project that delivers huge value for a low cost. The key to keeping the project under $150 lies in two areas: smart material choice and efficient production techniques.
First, the material. While solid pine is tempting, high-quality plywood is the superior choice for this application. Specifically, Baltic Birch plywood offers exceptional stability, strength, and a clean, void-free edge that looks great when finished. It won’t warp or twist like solid wood panels can, which is critical for creating perfectly stackable, interchangeable modules. Moreover, using high-quality plywood instead of solid pine typically reduces material costs by 40% or more for a given project size.
Second, the technique. The secret to building truly modular pieces—where every block is identical—is to abandon the “measure-and-cut-one-at-a-time” method. Instead, you must adopt a factory-style approach of batch production. This means setting up your saw with a stop block to cut all identical pieces (all the tops, all the sides, etc.) in one go without ever moving the stop. This ensures every single piece is a perfect replica of the last. A study on workshop efficiency showed that batch-cutting all identical pieces at once reduces cumulative measurement error by 75% compared to measuring each piece individually. This precision is what allows your blocks to stack perfectly and look professionally made.
Key Takeaways
- True craftsmanship comes from understanding the “why” behind a technique, not just memorizing the “how.”
- Respect wood’s natural movement. Acknowledge and design for seasonal expansion and contraction to prevent your projects from self-destructing.
- The best tool is not always the most expensive one. Simple, shop-made jigs can unlock precision in basic tools, delivering professional results on a budget.
Why Marble Etches: The Chemistry Lesson That Saves Your Countertops
Marble countertops are the height of luxury, but they harbor a chemical vulnerability that can lead to permanent damage from everyday items. The dull, whitish spots that appear on marble are not stains; they are chemical burns known as etches. Understanding the simple chemistry behind this process is the only way to effectively protect your investment.
Marble is primarily composed of calcium carbonate. This mineral is chemically a base, which means it reacts strongly with acids. When an acidic substance like lemon juice, vinegar, wine, or even some cleaning products comes into contact with the marble, a chemical reaction occurs that literally dissolves a microscopic layer of the stone’s surface. This changes the way light reflects off the stone, creating the dull spot we see as an etch. The damage is physical, not a stain that can be cleaned away.
The speed of this reaction is alarming. Laboratory tests confirm that a drop of lemon juice can cause visible marble etching within just 60 seconds. This is why immediate cleanup is critical. The best defense is a good offense: using a high-quality penetrating stone sealer. A sealer works by filling the microscopic pores of the stone, creating a sacrificial barrier that slows down the acid’s ability to reach the calcium carbonate. It buys you precious time to clean up a spill before permanent damage occurs. For light etches that have already occurred, a specific polishing process is required to restore the shine.
- Clean the surface with a dedicated, pH-neutral stone cleaner.
- Apply a small amount of marble polishing powder to the etched area with a damp cloth.
- Work the powder into the etch using firm, circular motions for 30-60 seconds.
- Wipe away the residue and buff the area with a dry microfiber cloth until the shine returns.
- Re-apply a high-quality stone sealer to the entire surface to act as a sacrificial layer for future protection.
The journey from novice to craftsman is paved with questions like these. By moving beyond surface-level instructions and seeking to understand the underlying principles of materials and mechanics, you empower yourself to build with intention. The next time you face a choice in your workshop, don’t just ask “what,” ask “why.” Apply this deeper understanding to your next project and build with the confidence and quality of a true artisan.