
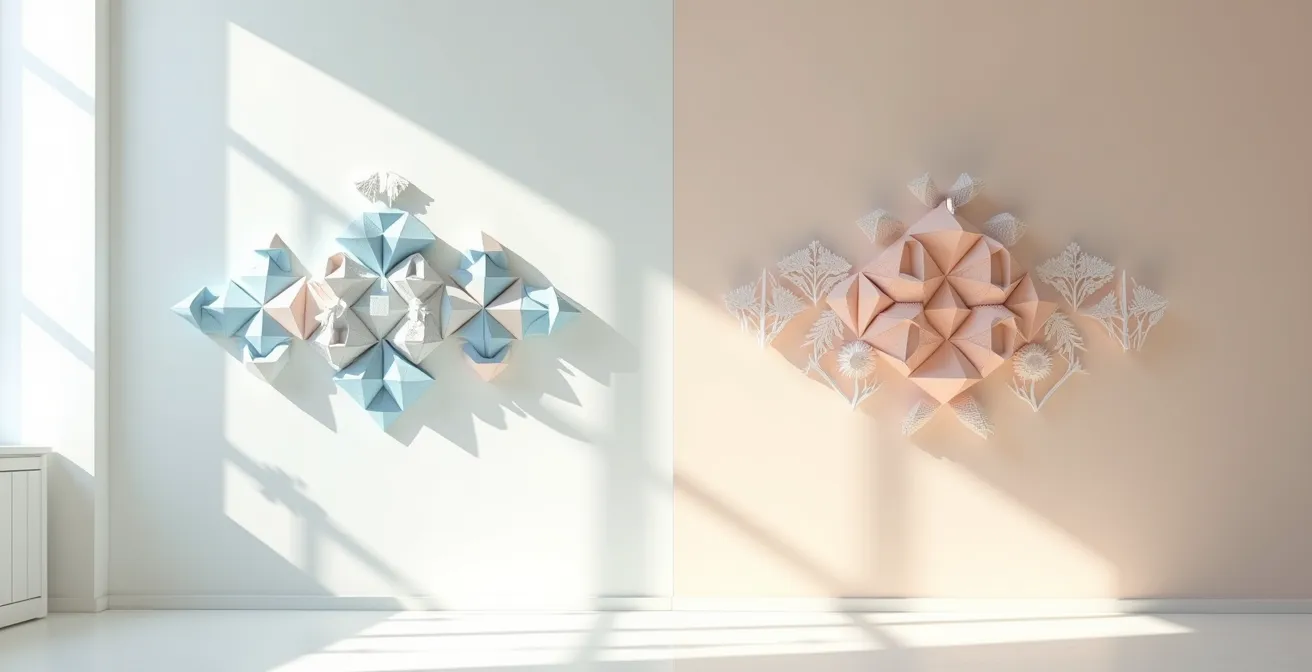
The choice between Origami and Kirigami for event decor isn’t aesthetic; it’s a strategic decision based on structural integrity and light interaction.
- Kirigami (cutting) excels in creating intricate, flat patterns best viewed with even, wall-washing light.
- Origami (folding) builds volumetric shapes that demand dramatic, angled grazing light to reveal their depth and shadows.
Recommendation: For large-scale backdrops, choose Kirigami. For standout focal points, choose Origami. Always match your lighting technique to the art style for a professional finish.
As a decorator, you face the constant challenge of transforming a blank space—be it a rental apartment for a party or a cavernous event hall—into something magical, often on a tight budget. Paper art, with its low cost and high impact, is a go-to solution. The conversation often begins and ends with a simple question: Origami or Kirigami? Many will say it’s a matter of taste: the pure folding of Origami versus the cutting and folding of Kirigami. This simplistic view, however, misses the point entirely for ephemeral and event styling.
The real distinction lies not in the basic definition, but in the physics of the material and its interaction with the environment. The decision is a technical one. It’s about understanding how a paper’s weight affects its ability to hold a shape over an eight-hour event, how a certain fold casts a shadow under angled light, and how to hang a 10-foot installation without leaving a single mark on the wall. The global art paper market, projected to reach $23.8 billion by 2033, is innovating, but the fundamental principles of structure and light remain the artist’s most powerful tools.
But what if the key to breathtaking paper decor wasn’t just artistic skill, but a strategic understanding of these material constraints? This guide moves beyond the “folding vs. cutting” debate. We will delve into the technical considerations that allow you to choose the right technique not just for its look, but for its performance, durability, and visual impact in a temporary setting. We’ll explore paper properties, lighting mechanics, hanging methods, and production realities to empower you to create stunning 3D wall art that is both beautiful and intelligently designed.
Contents: Origami vs. Kirigami: A Strategic Guide for Decorators
- Cardstock vs. Crepe: Which Paper Holds Its Shape for Large Flowers?
- LED Candles Only: The Fire Risk of Paper Luminaries Indoors
- Masking Tape vs. Blue Tack: How to Hang Paper Art Without Greasy Spots?
- Cricut Blade Life: Why Your Paper Is Tearing Instead of Cutting Cleanly?
- Recyclable vs. Compostable: Can You Actually Recycle Glitter Paper?
- IP44 vs. IP65: Which String Lights Can Survive a Heavy Rainstorm?
- Matte vs. Gloss: Which Sealer Makes DIY Clay Look Like Professional Porcelain?
- Wall-Washing vs. Grazing: How to Highlight Stone Fireplaces?
Cardstock vs. Crepe: Which Paper Holds Its Shape for Large Flowers?
The first decision in any paper art project is the medium itself, and for event decor, this choice dictates the project’s lifespan. The primary battle is between structural integrity and organic form. Cardstock, with its rigidity, is the architect’s choice. It’s engineered for crisp folds and sharp geometric lines, making it ideal for Kirigami’s precise cutouts and Origami’s architectural modules. It provides the necessary stiffness to prevent wilting over the course of a multi-hour event, especially for large-scale pieces like oversized flowers or wall panels.
Crepe paper, in contrast, offers an unparalleled organic quality. Its natural stretch and delicate texture are perfect for mimicking the soft, ruffled petals of real flowers. This makes it a favorite for Origami botanicals. However, its greatest strength is also its greatest weakness in an event setting: it is highly susceptible to “material fatigue.” Humidity and even subtle air conditioning drafts can cause it to lose shape. For a decorator, this means a crepe paper installation might look perfect at the start of an event but appear droopy and tired by the end.
The following table breaks down these practical differences, highlighting how each paper performs under the typical stresses of an event environment.
| Property | Cardstock | Crepe Paper |
|---|---|---|
| Humidity Resistance | Maintains rigidity in 50-60% humidity | Wilts and loses shape above 55% humidity |
| Air Conditioning Impact | Remains stable | Delicate petals flutter in drafts |
| 6-8 Hour Event Durability | Holds sharp edges throughout | Progressive drooping after 4 hours |
| Light Interaction | Creates sharp, dramatic shadows | Soft, diffused romantic lighting |
| Best for | Kirigami geometric designs | Origami organic shapes |
Ultimately, the choice is strategic: for geometric backdrops and sculptures that must endure, cardstock is the reliable workhorse. For romantic, softer elements in a climate-controlled space where a little dynamic movement is acceptable, crepe paper delivers an unmatched aesthetic.
LED Candles Only: The Fire Risk of Paper Luminaries Indoors
Paper and flame are a timelessly dangerous combination. For any decorator creating luminaries or other illuminated paper art, the rule is absolute: use only cool-running LED candles. The risk of fire from a real tea light is not just a possibility; it’s an inevitability. Even if a flame doesn’t directly touch the paper, the heat generated is enough to cause scorching, discoloration, and eventual ignition, especially in enclosed designs. This is non-negotiable for professional and safe event styling.
Beyond the immediate fire hazard, the choice of technique—Origami versus Kirigami—affects the luminary’s design and light quality. Origami luminaries, built from folded, uncut sheets, tend to produce a soft, diffuse glow. The paper’s translucency becomes the main factor in its brightness. Kirigami, with its deliberate cutouts, transforms a luminary from a simple light source into a projector. The intricate patterns cast sharp, defined shadows on surrounding surfaces, adding a layer of dynamic texture to the room’s ambiance.
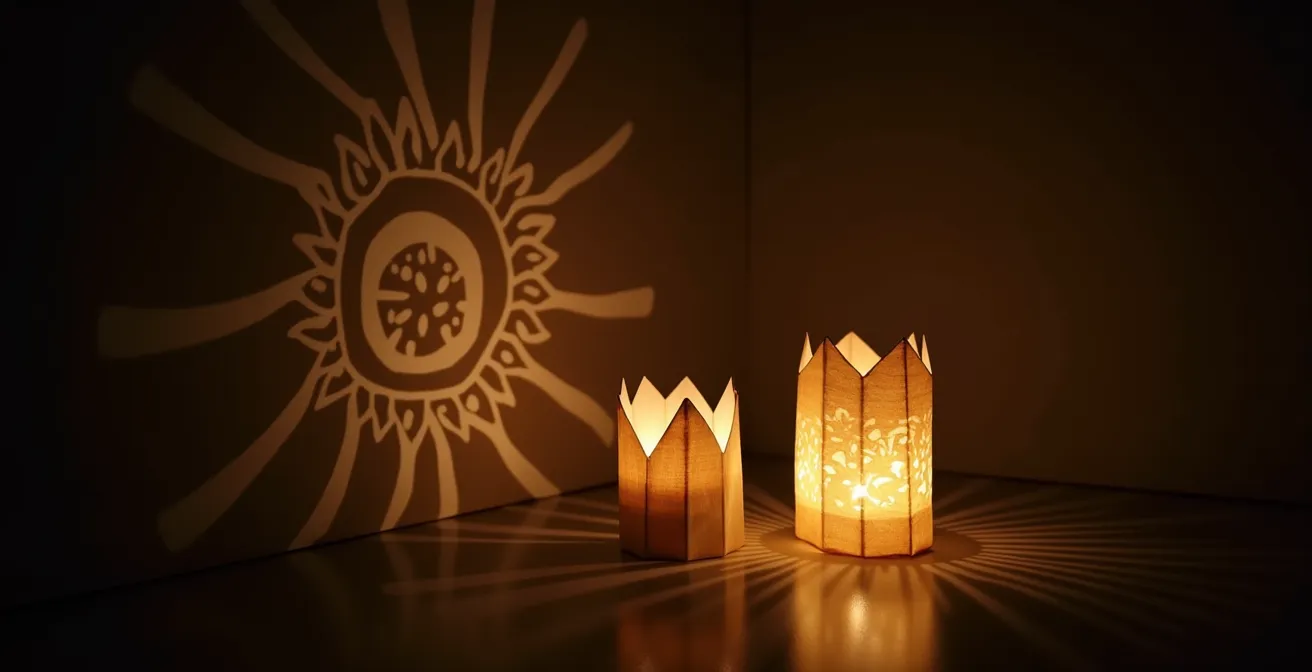
This difference in light interaction is a key strategic choice. An Origami luminary creates pools of soft, romantic light, ideal for table centerpieces. A Kirigami luminary, on the other hand, can be used to “paint” a wall with light, turning a blank surface into a feature. However, Kirigami designs also require careful consideration of heat dissipation. The cutouts provide natural ventilation, which helps prevent even low-power LEDs from building up enough heat to yellow or warp the paper over a long evening.
For high-traffic areas, the structural form also matters. Box-based Origami luminaries can be weighted with sand for stability, while more delicate Kirigami pieces are often better positioned against a wall to prevent them from being knocked over.
Masking Tape vs. Blue Tack: How to Hang Paper Art Without Greasy Spots?
Creating beautiful paper art is only half the battle; installing it without damaging the venue’s walls is what separates an amateur from a professional decorator. This is especially critical for rentals and event spaces where security deposits are on the line. The primary enemies are greasy residue from tacky putties and paint peeling from overly aggressive tapes. The right installation mechanics depend on three factors: the weight of the paper art, the type of wall surface, and the desired visual effect.
For lighter Kirigami pieces or small Origami models, painter’s tape (specifically the extra-light adhesion variety for delicate surfaces) or small, rolled balls of Blue Tack can suffice. The key with Blue Tack is to use minimal amounts and apply it only at reinforced corners to prevent oils from leaching into the paper or the wall paint over several hours. For glossy or semi-gloss paint finishes, Blue Tack is generally safer; for matte or flat finishes, painter’s tape is less likely to pull up the surface.
As the Gathered.how Editorial Team notes in their “Kirigami Beginners Guide,” paper choice itself influences hanging needs: a 160gsm paper thickness is rigid enough to support a folded shape without needing excessive support, yet remains manageable. For heavier modular Origami, such as large stars or complex polyhedra, these lightweight solutions will fail. Here, you must escalate to structural hanging solutions like 3M Command clear mini hooks or removable poster strips. These are designed to hold more weight (check the package for ratings) and distribute the load, yet still promise clean removal. For a truly professional “floating” effect, threading clear fishing line through the top of the artwork and attaching it to small ceiling hooks creates a stunning visual, completely avoiding wall contact.
Whatever method you choose, the golden rule is to conduct a 24-hour patch test. Apply your chosen adhesive to a small, hidden area of the wall (e.g., behind a door or a piece of furniture) to check for any residue, discoloration, or paint damage before committing to the full installation.
Cricut Blade Life: Why Your Paper Is Tearing Instead of Cutting Cleanly?
For large-scale Kirigami backdrops, a cutting machine like a Cricut or Silhouette is a decorator’s best friend, enabling a level of precision and speed impossible by hand. However, this introduces a new technical challenge: blade wear and its impact on production efficiency. When your machine starts tearing or fraying the edges of your paper instead of slicing cleanly, the culprit is almost always a dull blade. Paper, especially fibrous or textured cardstock, is surprisingly abrasive. A blade’s sharp edge degrades with every meter of cutting.
A dull blade doesn’t just create an unprofessional, ragged look; it snags and pulls the paper, potentially ruining an entire sheet and wasting both time and materials. For an event decorator on a deadline, this can be disastrous. Understanding the economics of blade replacement is therefore a crucial part of project planning. While Origami involves no equipment cost beyond the paper itself, machine-cut Kirigami has both an initial investment and ongoing consumable costs.

The cost-benefit analysis below shows that while a machine offers speed, the cost of blade replacements for a large project can be significant. This must be factored into your budget when quoting a client or planning a large installation.
| Factor | Kirigami (Machine Cut) | Origami (Hand Folded) |
|---|---|---|
| Initial Equipment Cost | $200-400 (cutting machine) | $0 (hands only) |
| Blade Replacement Cost | $15-25 per blade | N/A |
| Blade Life (80lb cardstock) | 50-75 meters of cuts | N/A |
| 10ft Wall Backdrop Cost | 3-4 replacement blades ($45-100) | Time investment only |
| Production Speed | Fast with setup time | Slower but consistent |
| Skill Requirements | Machine operation knowledge | Manual dexterity and patience |
To maximize blade life, always use a clean, non-worn cutting mat and ensure your machine’s pressure settings are correctly calibrated for your specific paper type. When you see the first signs of tearing, don’t try to push through—replace the blade immediately. The crisp, clean edge is the hallmark of professional Kirigami.
Recyclable vs. Compostable: Can You Actually Recycle Glitter Paper?
In an era of increasing environmental awareness, the lifecycle of your decor is a growing consideration for clients and venues. The ephemeral nature of paper art can be both its charm and its environmental downfall. The key distinction to understand is between recyclable, compostable, and waste. Standard, uncoated paper used for Origami and Kirigami is broadly recyclable. The issue arises with coatings and additives designed to make the art pop.
The biggest offender is traditional glitter. Glitter is made of microplastics bonded to paper, making the final product a composite material that contaminates the paper recycling stream. Glitter-coated paper is not recyclable and must be thrown in the trash. This has led to the rise of “eco-glitter” made from cellulose, but even these have limitations; they often require industrial composting facilities to break down effectively and may languish for months or years in a home compost pile.
Case Study: Modern Kirigami and Waste Reduction
As noted by Kirigami artists, the technique inherently creates waste from cut-outs. To address this, many are now embracing sustainability by using recycled papers. Furthermore, they’ve developed creative solutions for the offcuts, known as “chads.” Instead of being discarded, these small pieces are incorporated into secondary art projects, used as confetti for table settings, or embedded in other mixed-media pieces, significantly reducing the project’s overall waste footprint compared to simply throwing the scraps away.
From a sustainability perspective, Origami has a clear advantage as it typically uses 100% of the paper sheet with zero cutting waste. Kirigami, by its nature, can generate 15-30% material waste from its cut-outs. Savvy artists, however, are turning this “waste” into a feature, as seen in the case study. For decorators aiming for a sustainable practice, choosing uncoated, recyclable papers is the first step. For clients who desire a sparkle effect, steer them towards pearlescent or holographic papers that achieve their shimmer through mineral coatings (mica) or embossing, not microplastics.
Always check local recycling guidelines, but as a rule of thumb, if the paper is coated in plastic, foil, or glitter, it belongs in the landfill. Educating your clients on these choices positions you as a responsible and knowledgeable decorator.
IP44 vs. IP65: Which String Lights Can Survive a Heavy Rainstorm?
When taking paper art outdoors, even for a single evening, moisture becomes the primary threat. This applies not just to the paper itself, but also to the lighting elements that bring it to life after dusk. For any electrical component used outside, understanding its Ingress Protection (IP) rating is crucial for both safety and functionality. An IP rating consists of two numbers: the first indicates protection against solids (like dust), and the second indicates protection against liquids (water).
For string lights intended to illuminate an outdoor paper installation, you will commonly see IP44 and IP65. An IP44 rating means the product is protected against solid objects larger than 1mm and water splashing from any direction. This is sufficient for a sheltered location, like under a covered patio or awning, where it might be exposed to light mist or splashes but not direct rain. It is not waterproof.
An IP65 rating, however, offers a much higher level of protection. It is fully dust-tight and protected against low-pressure water jets from any direction. This means a set of IP65 string lights can withstand a heavy rainstorm. If your paper art installation is in an area exposed to the open sky, IP65 is the minimum rating you should consider for your lighting. Using IP44-rated lights in an exposed area is a recipe for a short-circuit and a ruined event.
Of course, the lights may survive, but the paper will not. Paper is incredibly sensitive to atmospheric moisture. A study on humidity in the paper industry shows that a humidity change of ±10%RH results in a length change of typically 0.1-0.2%. While that seems small, across a large piece of art, it manifests as warping, sagging, and loss of structural integrity. For any outdoor paper decor, it’s best to assume it is for single, dry-weather use only unless you are using specialized waterproof materials like synthetic Tyvek paper.
A smart decorator always monitors the dew point; if the ambient temperature is forecast to drop within a few degrees of the dew point, condensation will form on all surfaces, turning your crisp paper art into a soggy mess. When in doubt, plan to bring it indoors.
Matte vs. Gloss: Which Sealer Makes DIY Clay Look Like Professional Porcelain?
While paper is the focus for lightweight, ephemeral wall art, sometimes a decorator needs more durable elements for a tablescape—such as table numbers, place card holders, or centerpiece bases. Here, air-dry clay is an excellent complementary material. But to elevate it from a crafty look to a professional aesthetic, the choice of sealer is paramount. The debate between matte and gloss finishes is an aesthetic one that defines the event’s entire mood.
A matte sealer provides an organic, earthy finish. It absorbs light, giving the clay piece a soft, modern, and understated look that feels natural and high-end. This finish is perfect for rustic, bohemian, or minimalist themes. Its main drawback is that it’s more porous and can be harder to clean if, for example, a guest spills wine on it.
A gloss sealer, on the other hand, transforms air-dry clay into something that mimics the look of expensive, high-fire porcelain. It reflects light, creating a luxurious, polished, and formal appearance. This is the ideal choice for glamorous, classic, or black-tie events. The slick surface is also non-porous and can be easily wiped clean, making it a more practical option for items that will be handled on a table.
The choice between paper and sealed clay for decor elements comes down to application and reusability, as this comparison highlights.
| Decor Element | Clay (Sealed) | Paper (Origami/Kirigami) |
|---|---|---|
| Reusability | Permanent, multi-event use | Single-use, ephemeral |
| Best Applications | Table numbers, card holders, centerpiece bases | Wall installations, hanging decor, backdrops |
| Matte Finish Effect | Organic, modern, earthy aesthetic | Soft, romantic paper texture |
| Gloss Finish Effect | Luxury porcelain appearance | Metallic/holographic paper options |
| Spill Resistance | Gloss seal wipes clean easily | Paper absorbs liquids, permanent damage |
| Setup Time | 24-48 hour drying needed | Immediate use after folding/cutting |
By using sealed clay for durable table elements and lightweight paper for impactful wall decor, a decorator can create a cohesive, multi-layered design that is both beautiful and practical for the specific demands of an event.
Key takeaways
- Match paper type to the environment: Use rigid cardstock for structural integrity in large pieces and delicate crepe paper for organic shapes in climate-controlled spaces.
- Technique dictates lighting: Kirigami’s flat, intricate cuts demand even wall-washing light, while Origami’s 3D folds require dramatic, angled grazing light to create shadows.
- Prioritize safety and clean removal: Exclusively use cool-running LEDs in paper luminaries and always test adhesives on a hidden patch of wall for 24 hours before full installation.
Wall-Washing vs. Grazing: How to Highlight Stone Fireplaces?
The principles used to highlight textured surfaces like stone or brick are directly applicable to revealing the subtle dimensionality of paper art. The wrong lighting can render a complex 3D installation flat and lifeless. The right lighting transforms it into a dynamic sculpture of light and shadow. The two fundamental techniques at a decorator’s disposal are wall-washing and grazing. The choice between them is not arbitrary; it must be dictated by the paper technique used.
Wall-washing involves placing a light source at a distance from the wall (typically 3-4 feet) to cast a wide, even field of illumination. This technique minimizes shadows and flattens texture. While this would be a poor choice for a stone fireplace, it is the perfect method for highlighting Kirigami. The even light allows the intricate cut-out patterns to be seen clearly without being obscured by distracting shadows, emphasizing the piece’s delicate, lace-like quality. It presents the art as a graphic pattern on a surface.
Unlike origami, which is solely based on folding, Kirigami introduces precise cuts to add depth and detail to the finished piece… This technique allows artists to create patterns, silhouettes, and even pop-up structures that seem to leap off the paper.
– Excel Blades Editorial, What Is Kirigami? A Beginner’s Guide
Grazing is the opposite. It involves placing the light source very close to the wall (6-12 inches) at a steep angle (15-30°). This technique rakes light across the surface, creating long, dramatic shadows that exaggerate texture. This is the essential technique for illuminating Origami. The sharp shadows catch on every fold, revealing the piece’s three-dimensional form and creating a sense of depth and volume that would be lost under flat, even light. Without grazing, a complex Origami model can look like a confusing jumble; with it, it becomes a powerful sculpture.
Action Plan: Auditing Your Lighting for Paper Art
- Points of Contact: Identify all paper art pieces and the key features to highlight—the sharp folds of an Origami crane or the delicate latticework of a Kirigami panel.
- Collecte: Inventory your available light sources (string lights, uplights, track lighting) and note their positioning capabilities and color temperature (Kelvin).
- Cohérence: Confront your lighting choice with the art’s technique. Is your grazing light properly accentuating your Origami? Is your wall-wash providing even coverage for your Kirigami?
- Mémorabilité/Émotion: Assess the shadow quality. Are the shadows sharp and dramatic or soft and even? Does this emotional quality align with the overall mood of your event?
- Plan d’intégration: Adjust light positions and angles. Install dimmers to adapt the intensity as ambient light changes throughout the event, ensuring your art is always the star.
By strategically matching the lighting technique to the paper art technique, a decorator moves beyond simply illuminating a piece to actively sculpting it with light, creating a truly professional and high-impact visual experience.
Frequently Asked Questions on Origami vs. Kirigami
What papers offer glitter-like effects without microplastics?
Pearlescent papers use mica-based coatings that are mineral-derived and recyclable. Holographic papers using embossing techniques create rainbow effects without added plastics.
How much waste does kirigami generate compared to origami?
Kirigami typically generates 15-30% material waste from cut-outs, while origami uses 100% of the paper sheet with zero cutting waste.
Can biodegradable glitter papers be composted at home?
Papers with cellulose-based eco-glitter can be composted in industrial facilities but may take 6-12 months in home compost systems.