
The secret to elevating upcycled jars from crafty clutter to designer decor isn’t about more ideas—it’s about adopting a professional’s execution-focused mindset.
- Success depends on mastering material science: choosing the right adhesive and preparing surfaces meticulously for a permanent, flawless bond.
- A production mindset, including realistic time planning (Hofstadter’s Law) and batching tasks, separates a frustrating weekend from an efficient, rewarding project.
Recommendation: Shift your focus from the final look to the process itself. Start by mastering one technique, like creating a faux-ceramic finish, to understand how material choices and application create a high-end result.
Every crafter knows the familiar pile: a growing collection of glass jars, saved from the recycling bin with the best of intentions. They hold so much potential, yet also a quiet dread. The fear is that after hours of effort, the result will scream “homemade” in all the wrong ways—a piece of decor that looks less like a sophisticated accent and more like, well, decorated trash. You see the tutorials with twine, chalk paint, and glitter, but you’re aiming for something more. You want an object with aesthetic integrity, something that could sit on a boutique shelf without betraying its humble origins.
The common advice to simply “get creative” misses the point entirely. The gap between a cheap-looking craft and a designer-quality object isn’t a lack of ideas; it’s a lack of professional technique. The real transformation happens when you stop thinking like a hobbyist decorating a jar and start thinking like a designer engineering an object. This involves a fundamental shift toward understanding material science, respecting tool discipline, and embracing a strategic workflow. It’s about knowing why one glue fails while another creates a permanent bond, why safety is non-negotiable for a flawless finish, and how to plan a project so it doesn’t consume your entire weekend.
This guide is built on that professional philosophy. We will move beyond the superficial and dive into the critical details that make all the difference. We will explore the chemistry of adhesives, the discipline of tool maintenance, the ethics of sourcing materials, and the powerful techniques that can transform a simple glass jar into a piece of faux-ceramic art. By mastering the process, you will finally unlock the potential in that pile of jars, turning them into decor you are truly proud to display.
To guide you through this professional approach, we’ve broken down the essential skills and considerations into a clear roadmap. This summary outlines the key areas of mastery that will elevate your upcycling projects from simple crafts to sophisticated decor.
Summary: Elevating Your Upcycled Jar Creations
- Hot Glue vs. E6000: Which Glue Won’t Peel Off Smooth Glass?
- Resin Crafting: Why You Must Wear a Respirator Even for Small Projects?
- Sharpening Scissors: How to Restore Blades Ruined by Cutting Wire?
- Thrift Flipping: Is It Unethical to Buy Plus-Size Clothes to Make Small Items?
- The “Hofstadter’s Law” of DIY: Why That “Quick” Project Will Take All Weekend?
- Table Saw vs. Circular Saw: Which Should You Buy First for Furniture Making?
- Thrift Store Furniture: How to Disinfect Upholstery to Avoid Bed Bugs?
- How to Make “Faux-Ceramic” Vases from Thrift Store Glass using Baking Soda Paint?
Hot Glue vs. E6000: Which Glue Won’t Peel Off Smooth Glass?
The first point of failure in many upcycling projects is the adhesive. Attaching embellishments, lids, or other elements to a non-porous surface like glass is a challenge in material science. Hot glue, a crafter’s staple, is a thermoplastic. It’s fast and easy, but its bond is purely mechanical and superficial. On a smooth surface like glass, it has nothing to grip, causing it to peel off easily with minimal force or changes in temperature. It’s suitable for temporary mock-ups, but not for a lasting, quality piece.
For a permanent, professional-grade bond, you need an adhesive that creates a chemical reaction. Industrial-strength adhesives like E6000 are solvent-based; as the solvents evaporate, the adhesive cures and forms a powerful, flexible, and waterproof bond that fuses to the glass on a microscopic level. The key to its success isn’t just the glue itself, but the meticulous surface preparation. Lightly scuffing the glass with 400-grit sandpaper creates micro-abrasions for the glue to grip, and cleaning with 99% isopropyl alcohol removes any oils that would prevent adhesion. This combination of the right adhesive chemistry and proper surface prep is what separates a fragile craft from a durable, high-quality object.
This comparative table from an analysis of glass adhesives breaks down the critical differences between common choices, highlighting why cure time and bond strength are more important than initial speed for professional results.
| Adhesive Type | Bond Strength | Flexibility | Heat Rating | Cure Time | Best For |
|---|---|---|---|---|---|
| Hot Glue | Moderate | Rigid when cool | 140°F | 30 seconds | Quick temporary fixes |
| E6000 | 3500+ PSI | Flexible | 180°F | 24-72 hours | Permanent bonds, indoor projects |
| UV-Curing Resin | Very High | Rigid | 200°F+ | Minutes with UV | Crystal-clear invisible bonds |
| Silicone Adhesive | High | Very Flexible | 400°F | 24 hours | Outdoor, water-exposed projects |
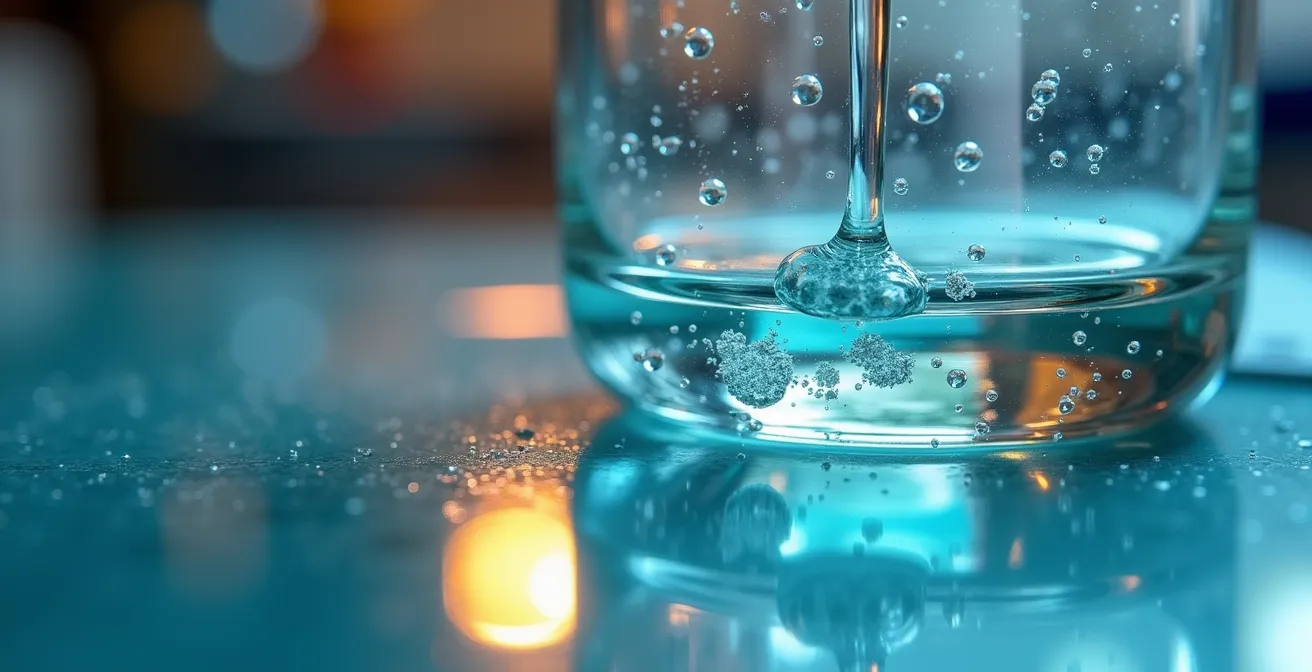
Resin Crafting: Why You Must Wear a Respirator Even for Small Projects?
Epoxy resin can provide an unmatched professional finish—a thick, glossy, crystal-clear coating that transforms a simple jar into a luxury item. However, this level of transformation comes with a non-negotiable responsibility: personal protective equipment (PPE). The chemical reaction that cures resin (the hardening process) releases volatile organic compounds (VOCs) into the air. Even with “low-odor” or “VOC-free” formulations, these fumes can be released and are sensitizers. This means that with each exposure, your body can become more reactive, potentially leading to a permanent allergy, respiratory issues, or skin irritation.
The danger is deceptive because it’s often invisible and odorless. A “small project” in a poorly ventilated space can create a concentrated cloud of these vapors. This is why a simple dust mask is insufficient. You need a respirator with organic vapor cartridges. According to safety experts, respirators must have a 95% filtration rating (N95 or higher) specifically for organic vapors to be effective. This isn’t a suggestion; it’s a baseline requirement for working safely with these chemicals. Adopting this practice is a hallmark of a professional mindset: long-term health is prioritized over short-term convenience. A flawless finish is meaningless if it comes at the cost of your well-being.
This macro photograph highlights the stunning, glass-like finish that resin can provide, demonstrating why mastering this material safely is a worthwhile endeavor for any serious upcycler.
Achieving this level of quality requires a dedicated and safe workspace. A proper setup includes not just the respirator but also nitrile gloves, safety goggles, and a plan for adequate cross-ventilation, ensuring that you are fully protected while you work to create a beautiful and durable piece.
Sharpening Scissors: How to Restore Blades Ruined by Cutting Wire?
A professional respects their tools, and a core tenet of that respect is using the right tool for the job. Using your good fabric or paper scissors to snip a piece of floral wire is a fast track to frustration. The soft steel of craft scissors is no match for hard wire, which creates nicks and burrs along the blade’s edge. A nicked blade won’t just struggle to cut; it will snag, tear, and ruin delicate materials, compromising the finish of your project. This is a classic case where a “quick shortcut” causes long-term damage.
The solution is twofold: prevention and restoration. The first and most crucial step is tool discipline. Dedicate a specific, inexpensive pair of wire cutters exclusively for metal. Label them clearly and store them separately from your craft scissors. This single habit prevents 99% of blade damage. For blades that are already damaged, a “tool triage” approach is necessary. Run your fingernail gently along the blade to diagnose the problem. A slight roughness is a burr, which can often be honed away with a few passes on a ceramic rod sharpener. A visible groove is a nick, which requires more intensive restoration with a whetstone or electric sharpener, starting with a coarse grit to grind down the metal past the nick and then progressing to a fine grit to restore the sharp edge.
Case Study: Professional Crafter’s Tool Maintenance System
A professional upcycling artist documented their tool care routine over 6 months: Paintbrushes cleaned immediately after use maintained perfect bristles for streak-free jar painting. Cutting mats rotated quarterly prevented grooves that cause fabric fraying. Glue gun tips cleaned with aluminum foil while warm prevented clogs that ruin precise application. The result of this disciplined maintenance was zero tool replacements needed despite completing over 200 jar projects, proving that tool care directly translates to higher quality work and lower costs.
Thrift Flipping: Is It Unethical to Buy Plus-Size Clothes to Make Small Items?
As resourceful crafters, we often turn to thrift stores for materials. This raises an important ethical question: is it acceptable to buy perfectly good plus-size clothing—a category already in short supply for those who need it—to cut it up for a small decorative project? The short answer is that it’s an ethically questionable practice when better alternatives exist. The core principle of resourceful upcycling should be to solve a problem (waste) rather than create another one (scarcity).
A professional and ethical approach involves a clear sourcing hierarchy. The highest priority should always be using materials you already own—fabric scraps from other projects or textiles from your own home that are no longer in use. The next best option is to specifically seek out damaged or stained items at the thrift store. A wine stain on a silk blouse or a tear in a linen shirt makes it unwearable for its original purpose but leaves plenty of pristine material for your jar project. This practice actively diverts items from the landfill. Only after exhausting these options should one consider purchasing intact, wearable clothing, and even then, it’s more responsible to choose from sizes that are abundant in the store.
Case Study: Creative Upcycling with Damaged Textiles
To demonstrate this principle, three sophisticated jar designs were created using only damaged textiles. A wine-stained silk blouse was transformed into elegant decoupage on mason jars, using only the undamaged portions for a luxurious finish. Torn vintage linen napkins were used to create textured jar lid covers, with their intentional fraying adding rustic charm. Lastly, a moth-damaged wool sweater was felted and cut into geometric shapes for modern jar cozies. Each of these projects specifically sought out damaged goods, turning textile waste into high-end decor without impacting the supply of wearable clothing.
The “Hofstadter’s Law” of DIY: Why That “Quick” Project Will Take All Weekend?
Hofstadter’s Law is a famous adage that states: “It always takes longer than you expect, even when you take into account Hofstadter’s Law.” For any DIY enthusiast, this feels painfully true. That “quick” project of turning a few jars into faux-ceramic vases spirals into a weekend-long saga. Why? Because we consistently underestimate the “hidden tasks” and their associated time: the stubborn label that requires multiple rounds of soaking and scrubbing, the paint that needs a second coat, and the crucial, non-negotiable drying and curing times.
Ignoring these realities leads to rushed work, compromised quality, and immense frustration. A professional upcycler combats this by shifting from a project mindset to a production mindset. Instead of working on one jar from start to finish, they implement a batching strategy. This workflow is far more efficient. You can spend Friday evening removing labels and sanitizing ten jars at once. Saturday morning is for priming and applying the first coat to the entire batch. While they dry, you’re free to do other things. Sunday is for the second coat and sealing. This assembly-line approach minimizes setup and cleanup time for each step and respects the passive (but essential) drying times.
The following table illustrates the dramatic difference between our optimistic estimates and the reality of a single-jar project, highlighting the many hidden tasks we often forget to budget time for.
| Step | Estimated Time | Actual Time | Hidden Tasks |
|---|---|---|---|
| Jar Sanitizing | 5 min | 20 min | Soaking, scrubbing stubborn spots |
| Label Removal | 10 min | 45 min | Adhesive residue removal, multiple applications |
| Surface Priming | 15 min | 30 min | Taping areas, workspace prep |
| Paint Coat 1 | 10 min | 20 min | Mixing paint, achieving even coverage |
| Drying Time | 1 hour | 4 hours | Humidity factors |
| Paint Coat 2 | 10 min | 20 min | Touch-ups, ensuring full coverage |
| Final Curing | Overnight | 24-72 hours | Temperature-dependent |
This image of an organized workspace demonstrates the power of a batching strategy, with jars at various stages of completion laid out in a clear, efficient production line.
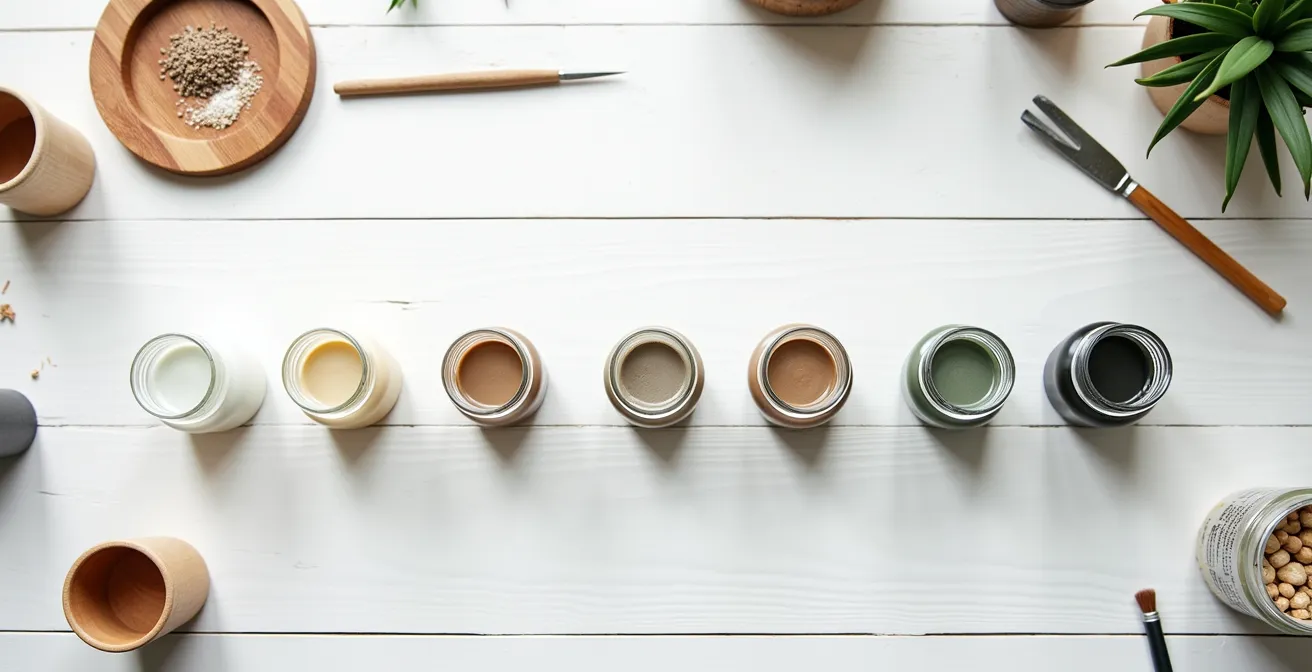
Table Saw vs. Circular Saw: Which Should You Buy First for Furniture Making?
While the H2 title refers to furniture making, in the context of upcycling jars, our “furniture” is often small-scale: custom wooden lids, small display shelves, or organizing trays. The choice of power tool here depends entirely on your goals: precision and repeatability versus flexibility and cost. A circular saw is a versatile, handheld tool. It’s relatively inexpensive and excellent for making straight, rough cuts. If you need to create a single, unique wooden lid or cut down a small piece of wood for a rustic stand, a circular saw is a fantastic first purchase.
A table saw, however, is a game-changer for precision and batch production. It is a stationary tool where the material is pushed through a fixed blade. This allows for incredibly accurate, repeatable cuts, which is essential if you want to make a matching set of ten custom lids that are all perfectly identical. The finish is cleaner, and the ability to set up jigs allows for complex, angled cuts with ease. It’s a bigger investment in both money and space, but it’s the tool that elevates your woodworking from a rustic, one-off hobby to a streamlined, professional-looking production.
Case Study: No-Power-Tool Alternative Success Story
An apartment-dwelling crafter proved that power tools aren’t the only path to a professional finish. They created a cohesive set of 12 spice jars with custom wooden lids using only hand tools and smart sourcing. By purchasing pre-cut wood circles from a craft store for $2 each, they bypassed the need for a saw entirely. They hand-sanded the edges for a perfect fit, used a manual drill for small details, and cut cork sheets with scissors for gaskets. The total cost was just $35, and the result was a high-end pantry set indistinguishable from store-bought versions, all completed in a small kitchen without noise or a large budget.
The following table compares the options, including a no-tool approach, to help you decide which path aligns best with your projects, space, and budget.
| Tool | Best For | Aesthetic Result | Cost | Space Required |
|---|---|---|---|---|
| Circular Saw | Single custom lids, rough cuts | Rustic-modern look | $50-150 | Minimal storage |
| Table Saw | Batch production, precise cuts | Sleek, repeatable designs | $200-500 | Dedicated workspace |
| Hand Saw + Miter Box | Small projects, quiet work | Artisan character | $30-60 | Very minimal |
| Pre-cut Materials | No-tool solutions | Professional finish | $5-20 per piece | None |
Thrift Store Furniture: How to Disinfect Upholstery to Avoid Bed Bugs?
When bringing any thrifted item into your home, whether it’s a large upholstered chair or a small glass jar, a thorough deep-cleaning is the first and most critical step. With furniture, the primary concern is pests like bed bugs and unseen bacteria. A rigorous inspection along seams and crevices, followed by a deep steam cleaning or professional treatment, is essential for safety and hygiene. This principle of forensic-level cleaning applies just as much to smaller finds, which carry their own set of contamination risks.
A thrifted glass jar isn’t just a blank canvas; it’s an object with a history. It might have held oily foods, pungent spices, or waxy candles. These residues, along with bacteria, can linger, especially in the hard-to-clean screw threads of the lid. In fact, food safety research shows that 73% of inadequately cleaned jars retain bacteria in these thread grooves. A simple rinse is not enough. A professional sanitization protocol involves multiple steps targeted at specific contaminants: an overnight vinegar soak to neutralize strong odors, a baking soda paste to break down oily residues, and a detail brush to scrub the threads. The final step is high-heat sanitization, either in a dishwasher on a hot cycle or by boiling the jars for 10 minutes to ensure they are truly clean and safe for their new life.
Your Jar Sanitization & Audit Checklist
- Initial Rinse & Soak: Rinse with hot water, then soak in hot, soapy water for at least 30 minutes to loosen labels and surface grime.
- Residue Triage: For stubborn odors (pickle, garlic), fill with a 1:1 vinegar-water solution and let sit overnight. For oily or waxy residue, scrub with a paste of baking soda and dish soap.
- Thread & Crevice Detail: Use a detail brush or old toothbrush to meticulously clean the screw threads on the jar and lid, as this is where bacteria hide.
- Final Sanitization: Once visibly clean, perform a final sanitization by either running the jars and lids through a hot cycle in the dishwasher or by boiling them in water for 10 minutes.
- Complete Drying: Allow jars to air dry completely upside down on a clean rack before using them for any project to prevent moisture from getting trapped.
Key Takeaways
- The difference between “crafty” and “designer” upcycling is a professional mindset focused on execution, not just ideas.
- Mastering material science—from adhesive chemistry to paint composition and safety protocols—is fundamental to creating durable, high-quality objects.
- Efficiency and quality are achieved through strategic planning, including realistic time assessment (Hofstadter’s Law) and batching tasks like a production line.
How to Make “Faux-Ceramic” Vases from Thrift Store Glass using Baking Soda Paint?
The faux-ceramic technique is perhaps the ultimate expression of transforming “trash” into treasure. It takes a transparent, mass-produced glass jar and gives it the opaque, earthy, and sophisticated texture of artisanal pottery. The magic ingredient is simple: baking soda. When mixed with acrylic paint, it creates a thick, textural medium that can be manipulated to mimic everything from fine, sandy stoneware to coarse, ancient terracotta. This is where your artistic intention meets material science to create a compelling textural narrative.
Mastery of this technique lies in controlling the ratios and application methods. A 3:1 ratio of paint to baking soda creates a fine, sandy texture, best applied with a dabbing sponge for a uniform, porous look. A 1:1 ratio produces a much coarser, stucco-like texture that can be applied with a palette knife in a crosshatch pattern to build up dimensional layers, mimicking hand-thrown pottery. You can also create sophisticated, custom colors by mixing standard acrylics; for example, a realistic terracotta can be achieved by blending burnt sienna with a touch of white and yellow ochre. For the final, professional touch, lightly sand the raised points after the paint has fully dried to simulate natural wear, and choose an ultra-matte varnish to seal the piece, completing the illusion of unglazed ceramic.
Designer-Quality Faux Ceramic Collection
A DIY artist utilized these advanced techniques to create a museum-quality collection of “ancient pottery” replicas using a variety of thrift store jars. They mixed a custom terracotta shade and applied a base coat with a 2:1 paint-to-soda ratio. They then added dimensional texture using a thicker 1:1 mixture applied with a natural sea sponge for organic variation. After drying, they dry-brushed a lighter tone on the raised areas to create depth and finished with an ultra-matte varnish. The resulting pieces were so convincing they sold at a local artisan market for $45-$65 each, with buyers unable to distinguish them from authentic, hand-made ceramics, as documented by a feature on their process.
By shifting your focus from simply decorating to intentionally engineering, you transform your entire creative process. The pile of jars is no longer a source of guilt, but a palette of raw materials. You now have the framework to choose the right adhesive for permanence, the knowledge to work safely with advanced materials, the discipline to maintain your tools, and the strategies to plan and execute your projects efficiently. The result is not just a better-looking object, but the deep satisfaction of having mastered a craft. Start by applying these principles to your next project, and watch as your upcycled creations earn a place of pride in your home.